Understanding Google Click ID (GCLID) for Better Marketing Results
Understanding Google Click ID (GCLID) for Better Marketing Results
July 26, 2025
Google Click ID (GCLID) is a unique identifier that is generated by Google Ads when someone clicks on your ad and it is then passed along to your landing page. The GCLID is used to better track your user’s journey from the ad click to the website conversion, allowing you to gain a better understanding of your advertising campaigns and to make informed decisions about your ad spend.
How GCLID works
GCLID works by tracking the journey of your user from the moment they click on an ad to the moment they convert on your website. The GCLID is created when the user clicks on the ad and is then passed along to the website through a parameter in your URL string. This allows you to track the user’s journey, including the page they landed on, how long they stayed on the page, and whether they converted or not.
The GCLID is a unique string of numbers that corresponds with the exact ad the user clicked on.
If you capture the GCLID in your reports, you can then import these into Google Ads account and see which specific campaigns resulted in a conversion. Here’s step-by-step instructions on how to do this.
You can also learn more about adding other tracking parameters by using UTMs.
Benefits of using GCLID
There are many benefits to using GCLID, including:
Improved tracking: By tracking the user’s journey from the ad click to the website conversion, advertisers can gain a better understanding of their advertising campaigns and make informed decisions about their ad spend. You can also get improved tracking with Device ID.
Better conversion tracking: With GCLID, advertisers can track conversions more accurately, allowing them to make better decisions about their advertising campaigns and to optimize their ad spend for better results.
Better data for optimization: The data collected through GCLID can be used to optimize advertising campaigns for better results, including higher conversion rates and lower cost per conversion.
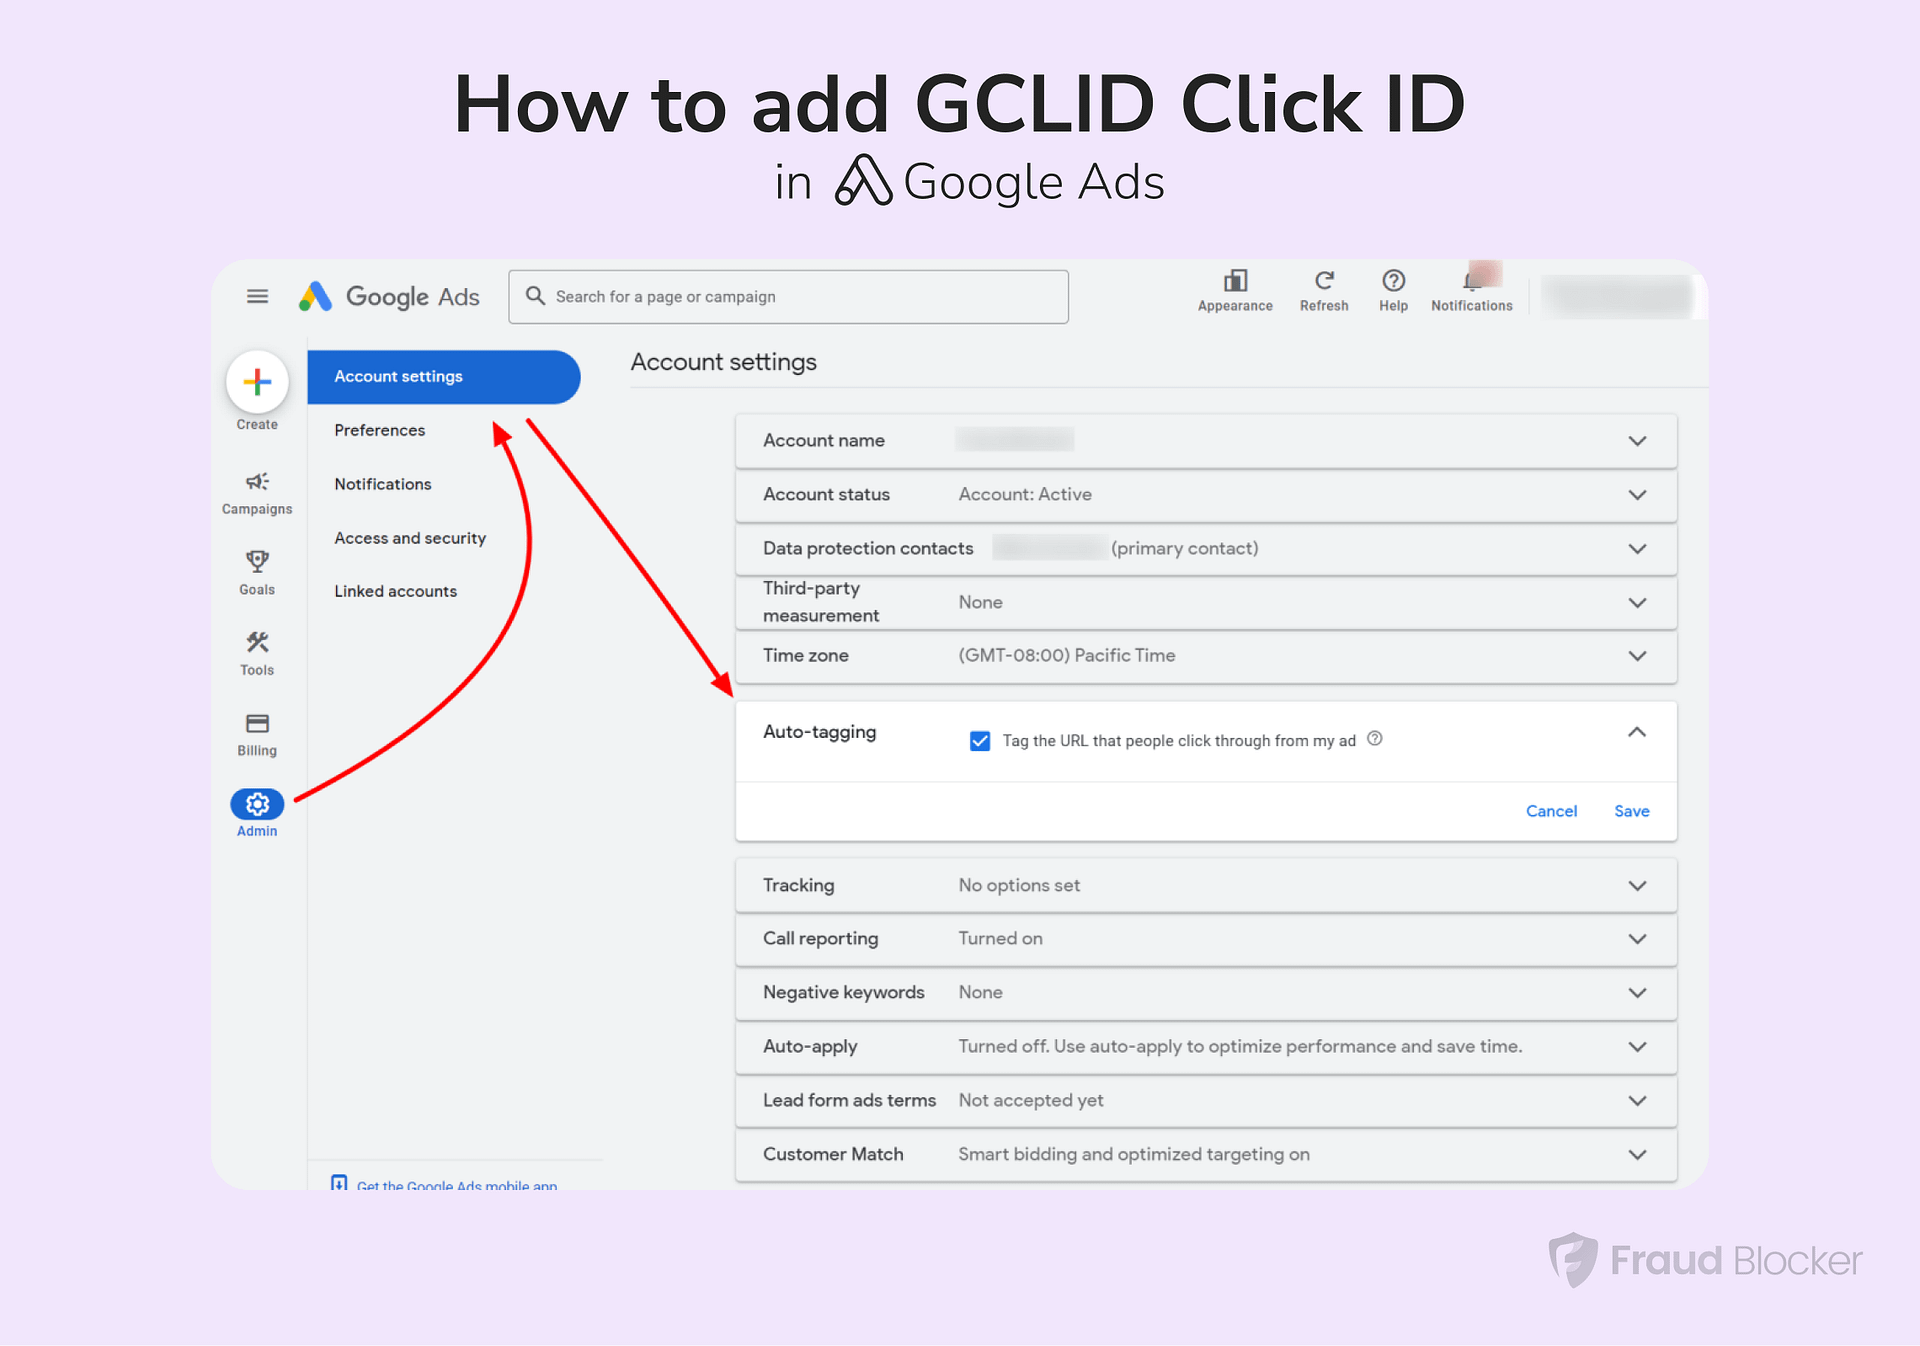
How to add GCLID
To make sure your GCLID tracking is working, you just need to enable auto-tagging in your Google Ads account.
Here’s how to check it’s set up correctly, and enable auto-tagging:
In your Google Ads account, select the Admin icon.
Select Account settings.
Select Auto-tagging.
Auto-tagging is turned on by default. To turn auto-tagging off, click the box next to “Tag the URL that people click through from my ad”.
Select Save.
How to automatically add GCLID to your Google Ads campaigns
If you’ve done this correctly, then you should now be seeing the GCLID parameter appended to your URLs on your landing pages after someone clicks your ad. If you don’t see it, then go here to help trouble-shoot your issue.
By understanding and utilizing GCLID, you can get the most out of your advertising campaigns and achieve better results. Adding GCLID can also help us better track your campaigns for fraud detection.
Whether you’re just starting out with Google Ads or are an experienced advertiser, understanding GCLID is critical to your success.
Facebook
Twitter
LinkedIn
Email
ABOUT THE AUTHOR
Brandon Tome
Brandon is the co-founder and Chief Growth Officer at Fraud Blocker with 15+ years of performance marketing experience and $100M in direct ad spend management. He specializes in driving growth and maximizing ROAS across B2B SaaS, fintech, marketplaces and more.
Brandon is the co-founder and CGO at Fraud Blocker with 15+ years of performance marketing experience. He specializes in driving growth and maximizing ROAS across B2B SaaS, fintech, marketplaces and more.
Average Google Ads CPC is $5.26, but our research shows advertisers are actually paying $5.62 due to invalid activity. Here's where the difference goes.